
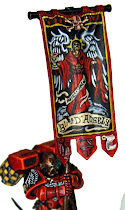
Ok Folks, Time for an update on my Grey technique! Here are some pictures of the model in progress. I decided to paint this half of him to a near state of completion before moving on with the tutorial. Needless to say, this is challenging. My model is ending up more blue than grey, which is not necessarily a bad thing.
In these first two pictures I compare the Dreadknight to my terminator I first painted with this technique. Obviously, the terminator was smaller with easier to paint armor plates. The smaller they are, the less I have to feather/blend the greys. That is, the less I have to drag out the blend. On the big plates I found myself creating new light sources so as to have new areas of blended grey.


In this closeup, you see the difference. The terminator legs pose a different challenge than the dread knight ones. To create the grey I start with Codex, then go to Fortress, Astronomicon, then white along with a couple applications of Asurmen Blue.

I tried to make the final white highlight as crisp and edged as possible. While I am not trying to recreate chrome with nonmetallic colors, I am using it as a reference, and when I looked at some bike handlebars for example, there were usually a bunch of dark shades, with one extreme line of white down the middle or on an edge.
A big problem I am having here is that the original model was sprayed black, then hand painted with Adeptus Battlegrey. This one was sprayed with Uniform Grey from army painter instead. The shade of grey is much lighter, and more easier over powered by the Asurman Blue wash. The Battlegrey held up to the blue wash, keeping the darks more grey than blue. However, I don't think the effect is bad on this. I kind of like the cold blue shade.
Now that I have a decent idea of how I am going to paint this guy, I can proceed with the tutorial. Next time, Fortress Grey and how it interacts with the Codex grey. As I paint the other side, I am going to push the relationship between the blue and the grey. I think I will water down the blue a bit more and try to get a smoother blend with the greys. Here's to learning!
Jawaballs


.jpg)
9 comments:
Very nice chris, that looks as cold as ice. nmm ice. R u doing the whole army like that?
Yup, the whole thing... every one... all... whimper
ha ha , poor jawa......But it will amazing and unique. Surly will win many best painted, as usual!
Loving it! keep up the good work buddy!
Duke
Looking great chris!
This is looking superb. And the fact that yoiu're pushing this kind of quality across the whole army makes me want to pray for your sanity ;) In all seriousness, I can't wait for more of the tutorial to come and to see the whole army like this!
Tim
Tim, these are still just plans at this point, I have a quarter of a Dreadknight finished so far. :)
I followed the airbrush tutorial on MWG and got some great results on the DK. I'm not even brushing anything bigger than a troop now (and I prime by airbrushing - a BILLION times better/cheaper than can priming).
http://www.miniwargaming.com/content/how-paint-grey-knight-dreadknight-part-1
Very Nice Jawa! can't wait to see the finished Dreadknight.
Post a Comment